PageCrawl includes a built-in MCP (Model Context Protocol) server that lets AI assistants manage your page monitors. You can add monitors, check history, trigger checks, and more, all through natural conversation with tools like Claude or ChatGPT.
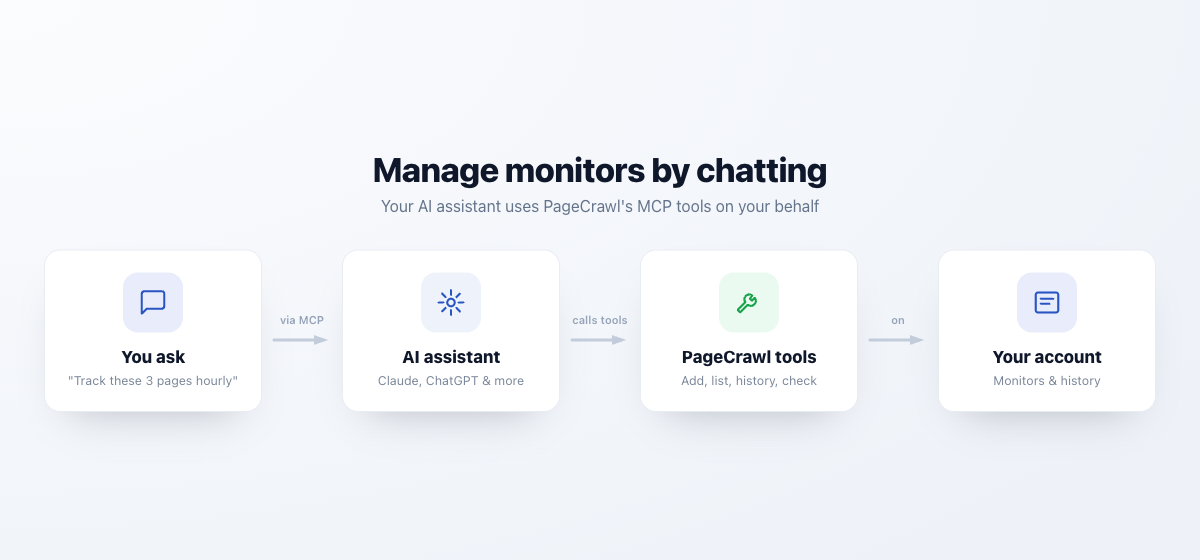
MCP is an open protocol that standardizes how AI tools connect to external services. Once connected, your AI assistant can directly interact with your PageCrawl account without you needing to use the web interface or API manually.
What You Can Do
The MCP server provides the following tools that your AI assistant can use:
| Tool | What It Does |
|---|---|
| Add page monitor | Create a new monitor with URL, tracking mode, frequency, and notifications. Available on all plans, including Free |
| List monitors | Search and view monitors across all workspaces by URL, domain, or name |
| Get monitor details | See full configuration of a specific monitor including tracked elements and latest values. Supports batch requests |
| Get monitor history | Retrieve historical checks and detected changes with AI summaries. Supports batch requests |
| Get latest values | Quickly retrieve just the current values for one or more monitors (e.g., current price). Supports batch requests |
| Get check diff | View the actual text differences detected in a specific check |
| Trigger check | Trigger a one-off check on a monitor |
| Manage tags | List workspace tags, or add and remove tags (labels) from monitors. Available on all plans, including Free |
| Manage folders | List the folder tree, create folders and nested subfolders, rename or delete folders, and move monitors into folders. Available on all plans, including Free |
| Mark changes seen | Mark detected changes as reviewed on one or all monitors. Available on all plans, including Free |
| List templates | View available templates that can be applied when creating monitors |
| List workspaces | View all your teams and workspaces with their IDs |
| Update monitor defaults | View or update default settings for new monitors created via MCP. Available on all plans, including Free |
Supported Element Types
When creating monitors through MCP, you can track the following element types:
- Full Page - Entire page text content (no selector needed)
- Text - Text content of a specific element (CSS selector required)
- Number - Numeric values with change thresholds
- Price - Price values with currency detection
- HTML - Raw HTML structure of an element
- JavaScript - Execute JavaScript and track the result
- File Hash - Monitor file changes by checksum (no selector needed)
- PDF - Track changes in PDF documents (no selector needed)
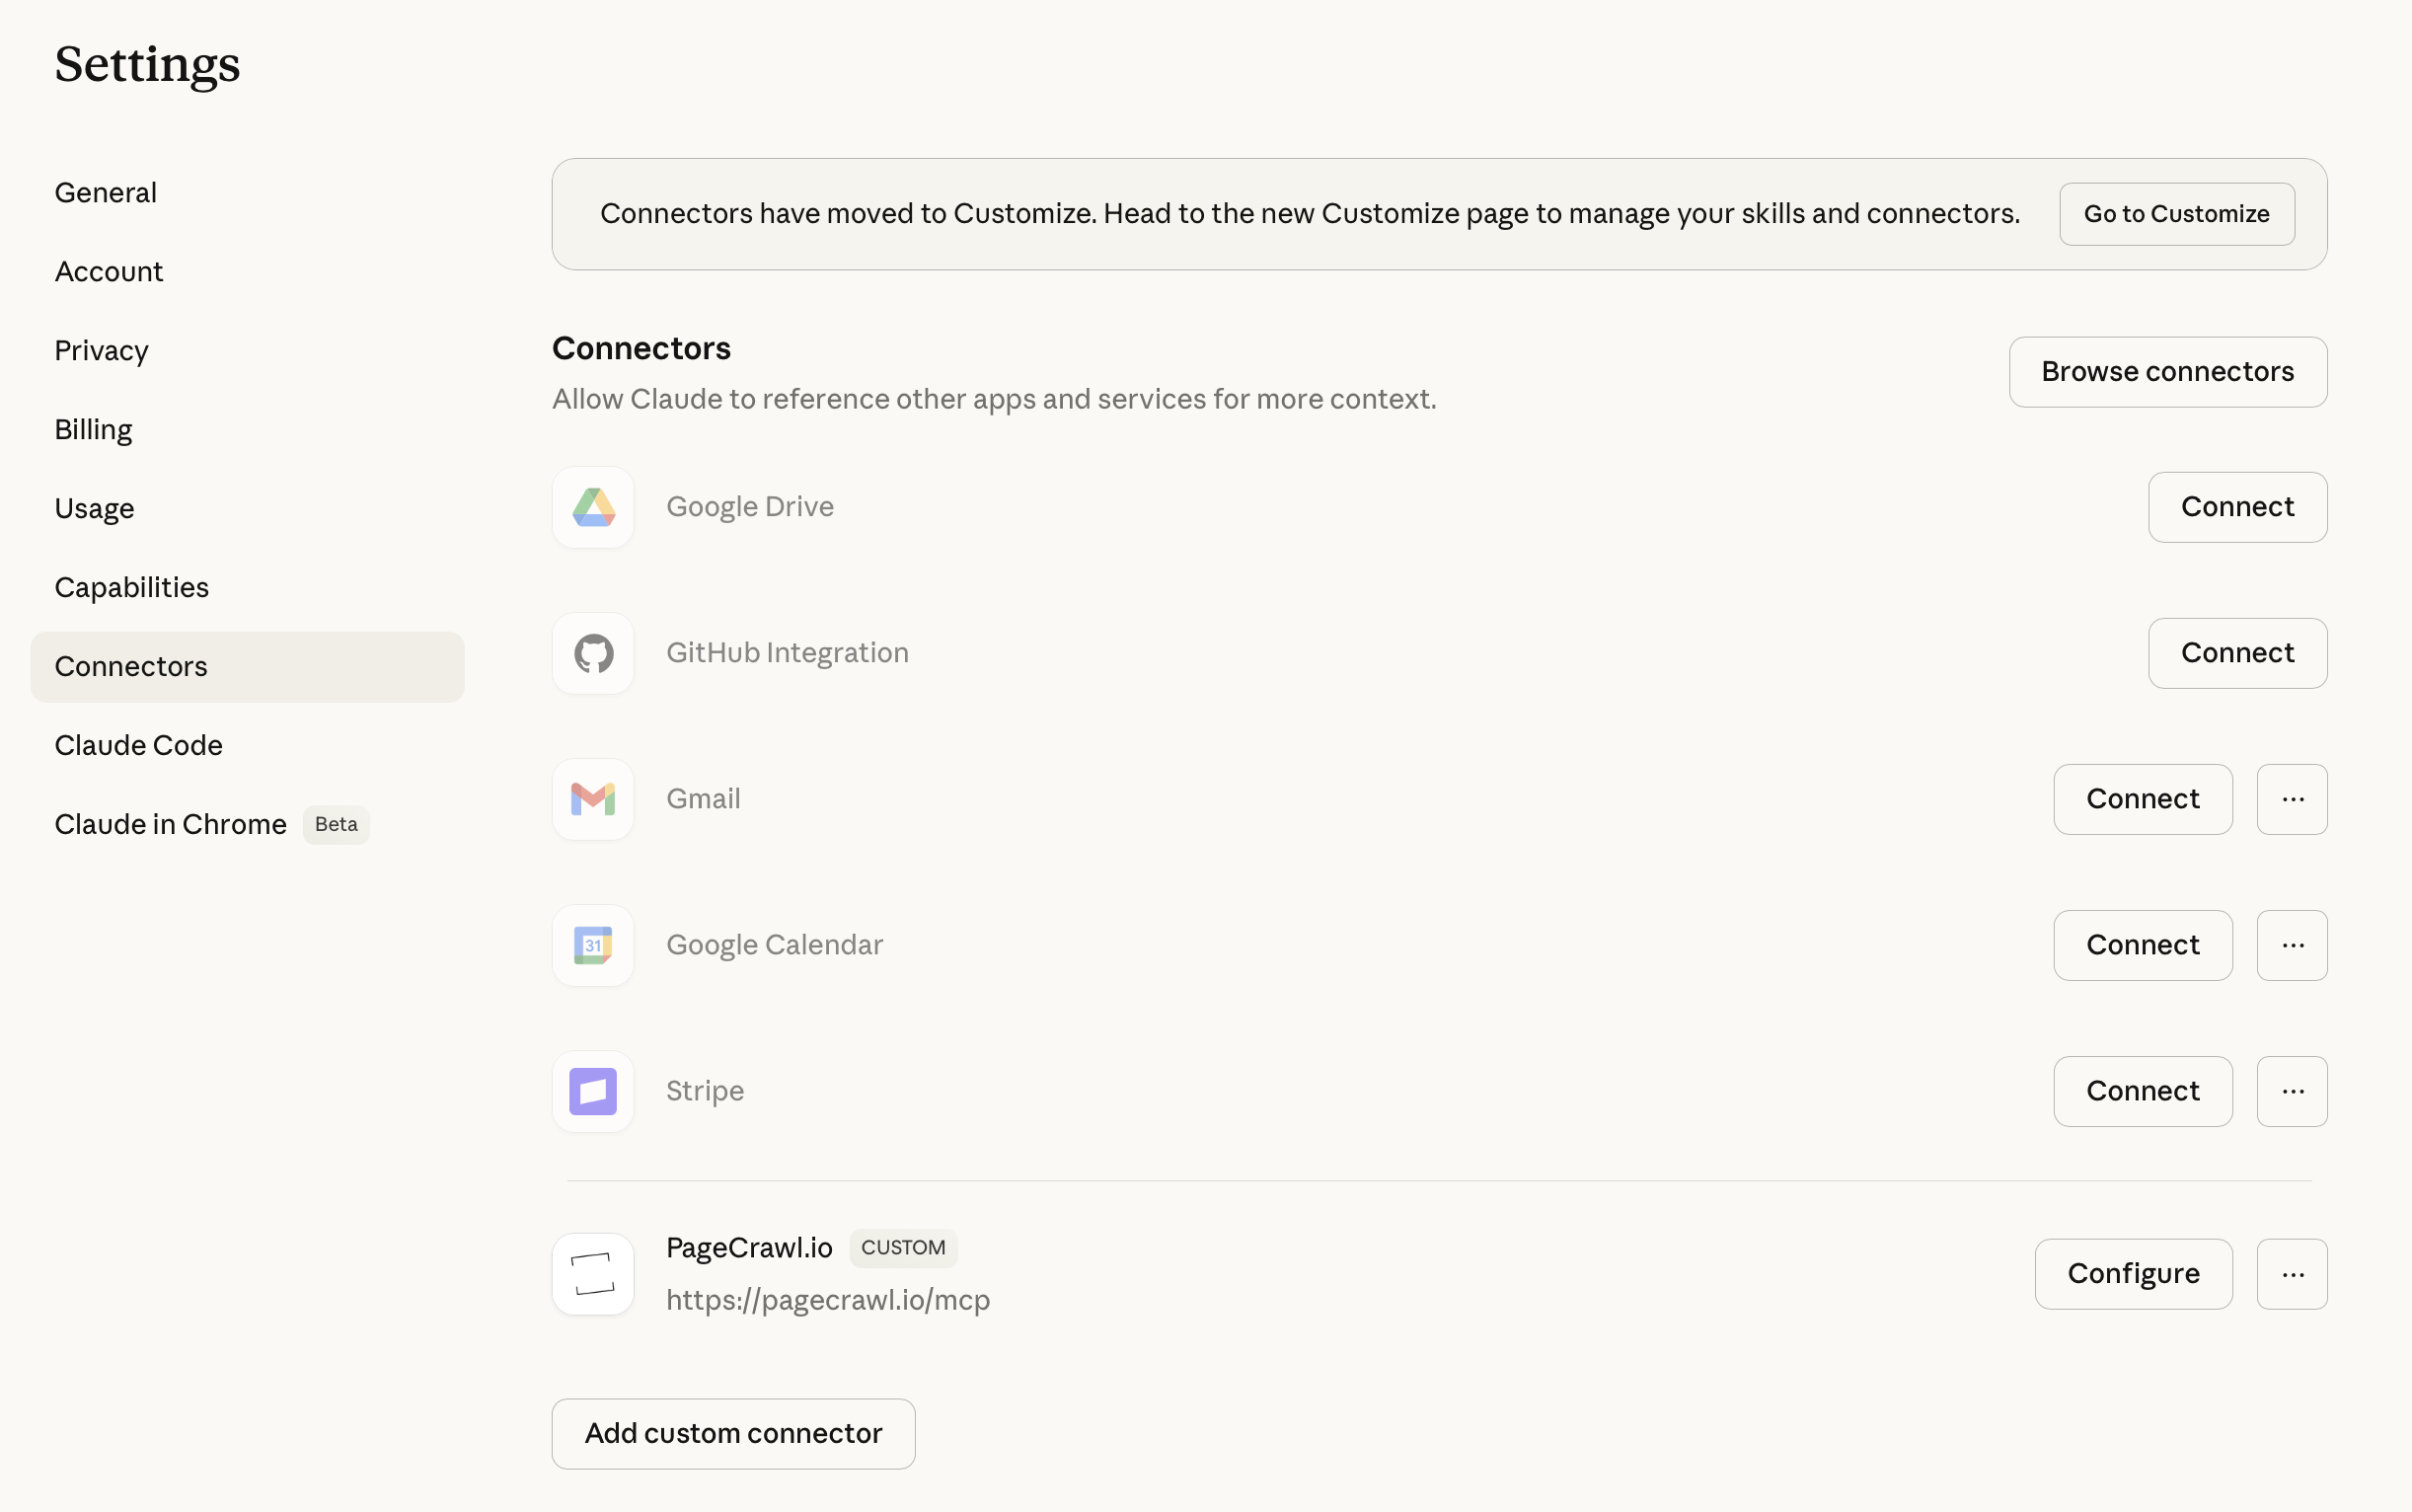
Setting Up with Claude (Web & Desktop)
- Open claude.ai or Claude Desktop and go to Settings
- Navigate to the Connectors section in the left sidebar
- Click Add custom connector at the bottom of the page
- Enter a name (e.g. "PageCrawl") and set the URL to:
https://pagecrawl.io/mcp - Click Add. You will be redirected to PageCrawl to authorize access
- Log in (if not already) and click Approve
- PageCrawl tools are now available in your conversations

Setting Up with Claude Code
Add the following to your .mcp.json file (in your project root or ~/.claude/):
{
  "mcpServers": {
    "pagecrawl": {
      "url": "https://pagecrawl.io/mcp"
    }
  }
}
When Claude Code first tries to use PageCrawl tools, it will open a browser window for you to authorize the connection via OAuth.
Setting Up with ChatGPT
Works with ChatGPT on web, desktop, and mobile. Requires a ChatGPT Plus, Pro, Team, Enterprise, or Edu plan.
- Go to chatgpt.com (or open the ChatGPT desktop app)
- Navigate to Settings > Connectors > Create
- Enter a name (e.g. "PageCrawl"), a short description, and set the URL to:
https://pagecrawl.io/mcp - Click Create. You will be redirected to PageCrawl to authorize access
- Log in and click Approve
- To use in a conversation, click the + button near the message input, select More, and enable PageCrawl
Setting Up with Other MCP Clients (OAuth)
Any MCP-compatible client that supports OAuth can connect to PageCrawl. The server details:
- URL:
https://pagecrawl.io/mcp - Authentication: OAuth 2.0 (automatic via MCP protocol)
- Protocol: MCP over HTTP with JSON-RPC 2.0
- OAuth Discovery:
https://pagecrawl.io/.well-known/oauth-authorization-server
The client will handle the OAuth flow automatically. No manual token setup is required.
Setting Up with API Token (OpenClaw, Cursor, Cline, Windsurf, and others)
For MCP clients that do not support OAuth, you can connect using a personal API token instead. This works with OpenClaw, Cursor, Cline, Windsurf, VS Code, Claude Code, and any other MCP client that supports custom headers.
Step 1: Generate an API token in PageCrawl:
- Go to Settings > API
- Click Create Token
- Give it a name (e.g. "OpenClaw") and click Create
- Copy the token. It will only be shown once.
Step 2: Add the following configuration to your MCP client. The JSON format below works with Cursor (.cursor/mcp.json), Cline, Windsurf (.vscode/mcp.json), Claude Code (.mcp.json), and most other clients:
{
  "mcpServers": {
    "pagecrawl": {
      "url": "https://pagecrawl.io/mcp",
      "headers": {
        "Authorization": "Bearer YOUR_TOKEN_HERE"
      }
    }
  }
}
For OpenClaw, use the CLI:
openclaw mcp set pagecrawl \
  --transport streamable-http \
  --url https://pagecrawl.io/mcp \
  --header "Authorization: Bearer YOUR_TOKEN_HERE"
For Cursor, you can also add via Settings > MCP Servers > Add > Streamable HTTP and enter the URL and authorization header there.
Example Conversations
Once connected, you can interact with PageCrawl naturally:
Adding monitors:
"Monitor example.com/pricing every hour and track the full page text"
"Set up price tracking for these 3 product pages: [url1], [url2], [url3]. Check every 15 minutes and notify me on Slack when prices drop."
Checking current values:
"What's the current price on my Amazon product monitor?"
"Compare the prices across all my competitor monitors right now"
Reviewing changes:
"Show me all monitors that changed in the last 24 hours with a summary of what changed"
"Show me the diff for the terms of service page. What exactly was added or removed?"
Analysis and reporting:
"Which of my monitors have had the most changes this month? Are there any patterns?"
"Give me a weekly summary: how many changes were detected across all monitors, which ones had price drops, and which ones had errors?"
Batch operations:
"Tag all monitors tracking amazon.com with 'competitor' and 'ecommerce'"
"Check the latest values for all monitors tagged 'pricing' and tell me which products are currently out of stock"
Troubleshooting:
"Are any of my monitors failing? Show me the ones with errors and what the issue is"
"The pricing page monitor hasn't detected changes in weeks. Trigger a fresh check and show me what it finds"
Setting up workflows:
"Create a monitor for each of these 5 competitor pricing pages. Use the 'competitor-tracking' template and tag them all as 'q2-research'"
"Monitor the SEC EDGAR page for new filings from Tesla. Use content-only mode so it ignores the navigation, check every 30 minutes"
Working with Workspaces
All tools automatically search across every workspace you have access to. You do not need to know which workspace a monitor is in to find or interact with it.
- Use List monitors with the
searchparameter to find monitors by URL, domain, or name - Use List monitors with
workspace_idto filter results to a specific workspace - Use List workspaces to see all your teams and workspaces with their IDs
- Add page monitor only requires a
workspace_idif you have more than one workspace
Limits and Quotas
MCP operations respect your plan's limits:
- Monitor creation counts toward your page monitor quota
- Triggered checks are rate limited and run at a lower priority than scheduled checks, so they may take a while to complete. This is designed for occasional, manual use only (one or two checks at a time). It does not support programmatic or automated triggering - requests that exceed rate limits will be rejected with an error. Instead, configure the check frequency on each monitor and use scheduling settings to run checks at specific times.
- If you exceed your monitor limit, new monitors are created in a disabled state
- If you exceed your check limit, manual check triggers will be rejected
See Check Limits and Website Limits for details on plan quotas.