# PageCrawl.io
> AI-powered website change monitoring and change detection platform
PageCrawl.io monitors web pages for changes and sends instant notifications when content updates. Track prices, availability, text, documents, and more using real browser rendering with AI-powered change summaries.
## What PageCrawl Does
PageCrawl.io is a cloud-based website monitoring service that detects changes on any web page and notifies you through your preferred channels. It uses real browsers (with full JavaScript support) to render pages exactly as a human would see them, then compares snapshots to detect what changed. AI analyzes every change to provide plain-language summaries and importance scoring, so you only get notified when it matters.
## Core Capabilities
- **Website Change Monitoring**: Detect text, visual, and structural changes on any webpage
- **Real Browser Rendering**: JavaScript-enabled monitoring for dynamic sites and SPAs
- **AI-Powered Change Summaries**: Get plain-language summaries of what changed, included on all plans
- **AI Importance Scoring**: Every change scored 0-100 by importance, set thresholds to filter noise
- **AI Pattern Learning**: Dismiss changes and AI learns, similar low-value changes are auto-filtered
- **Multi-Channel Alerts**: Email, Slack, Discord, Microsoft Teams, Telegram, webhooks, web push notifications
- **Element-Level Tracking**: Track specific elements with CSS/XPath selectors or monitor full pages
- **File Monitoring**: Track changes in PDFs, Word (.docx), Excel (.xlsx), PowerPoint (.pptx), CSV files
- **Cloud Document Monitoring**: Google Sheets, Google Drive, Microsoft SharePoint documents
- **Visual Comparison**: Side-by-side screenshot diffs and historical screenshot archives
- **Automatic Page Discovery**: Find new pages on any website via sitemap scanning, deep crawl, or URL scanning
- **Check Frequencies**: From every 2 minutes (Ultimate) to monthly schedules
- **Smart False-Positive Reduction**: Filter dates, ads, popups, dynamic content, combined with AI noise filtering
- **Cloudflare and Bot Detection Bypass**: Automatic bypass of anti-bot systems
- **Password-Protected Pages**: Monitor pages behind login forms
- **Browser Actions**: Click buttons, type text, remove overlays, scroll, wait for elements before capture
- **Team Collaboration**: Workspaces, user roles (owner, admin, standard, viewer), shared monitors
- **Review Boards**: Kanban-like board for compliance teams to review and flag changes
- **Bulk Management**: Import multiple URLs, bulk edit configurations, reusable page templates
- **Web Archiving**: Save complete web archives in WACZ format (Ultimate plan)
- **Monitoring Reports**: Daily, weekly, or monthly digest reports with AI summaries
- **Data Exports**: Export change history to Excel spreadsheets
## Tracking Modes
- **Full Page**: Monitor the entire visible text content of a page
- **Content Only**: Ignores navigation, headers, footers, focuses on main content
- **Reader Mode**: Uses Readability algorithm for clean article extraction
- **Price**: Auto-detects prices and tracks availability for e-commerce pages
- **Specific Text**: Track a specific element using CSS or XPath selector
- **Specific Number**: Track a numeric value on a page using CSS or XPath selector
- **Visual/Screenshot**: Detect visual layout changes via screenshot comparison
- **Links**: Track all links on a page for changes
- **HTML**: Monitor raw HTML source changes
- **File Hash**: Track binary file changes via SHA-256 hash
## Integrations
- Slack, Microsoft Teams, Discord, Telegram
- Email with Cc support and digest reports
- Web push notifications (Chrome, Firefox, Edge, Safari 16+)
- Webhooks for custom integrations
- Zapier (2000+ apps)
- n8n (community node with full API support)
- Google Sheets sync (auto-sync monitored data)
- Dropbox sync (auto-save screenshots)
- RSS feeds
- Home Assistant (via webhooks and REST API)
- RESTful API for programmatic access
- Browser extension for Chrome and Firefox
- iOS Safari bookmarklet
- MCP Server for AI assistants
## MCP Server (AI Assistant Integration)
PageCrawl.io provides an MCP (Model Context Protocol) server that lets AI assistants manage website monitors through natural conversation. Available on Enterprise and Ultimate plans.
- **MCP Server URL**: https://pagecrawl.io/mcp
- **Authentication**: OAuth 2.0
- **Compatible with**: Claude.ai, ChatGPT, Claude Code, Claude Desktop, Cursor, and any MCP-compatible client
- **Capabilities**: List workspaces, list/search monitors, get monitor details, get change history, add new monitors, trigger checks, manage tags, view diffs
## Common Use Cases
- **E-commerce & Price Monitoring**: Track competitor prices, product availability, inventory restocks
- **Compliance & Legal**: Monitor terms of service, privacy policies, regulatory filings, legal documents
- **Competitive Intelligence**: Track competitor websites for pricing, product, hiring, and content changes
- **Stock and Restock Alerts**: GPU stock (NVIDIA RTX), gaming consoles (PS5), networking equipment (UniFi), Tesla inventory, Raspberry Pi
- **Job Hunting**: Get alerts for new job postings on career pages and job boards
- **SEC Filing Monitoring**: Track EDGAR filings (10-K, 10-Q, 8-K, S-1, Form 4, 13-F)
- **Software Release Tracking**: Monitor release notes, changelogs, and version updates
- **Academic Research**: Track research papers, news, and competitor publications
- **Real Estate**: Monitor new property listings and price changes
- **Content Monitoring**: Track news sites, blogs, government pages for updates
- **Smart Home Automation**: Integrate with Home Assistant for automated responses to web changes
## Key Differentiators
- **Real browser rendering**: Unlike simple HTTP scrapers, PageCrawl uses real browsers that execute JavaScript, handle SPAs, and render pages exactly as humans see them
- **AI included on all plans**: Every plan includes AI credits for change summaries and smart filtering, no separate AI add-on needed
- **BYOK (Bring Your Own Key)**: Connect your own API key from OpenAI, Gemini, Anthropic, or OpenRouter for unlimited AI usage. OpenRouter gives access to any AI model available on the market, so you can choose the model that best fits your needs and budget
- **No data selling**: PageCrawl does not sell user data, offer data packs, or use customer data for AI training. Your data stays private.
- **File monitoring built-in**: Track PDFs, Excel, Word, PowerPoint, CSV, Google Sheets, and SharePoint documents natively
- **Automatic page discovery**: Find and start monitoring new pages automatically as they appear on any website
- **MCP Server for AI assistants**: Manage monitors through AI tools like Claude and ChatGPT
- **Browser extension**: One-click monitoring from Chrome or Firefox
- **Cloud-based, no installation**: Entirely browser-based, nothing to install
- **Since 2018**: Serving thousands of organizations including Microsoft, New York Times, Deloitte, Goldman Sachs, HubSpot, Yahoo, EY, and Stanford
## Pricing
- **Free Forever**: $0/month, 6 pages, 220 checks/mo, 60-min frequency, 90-day history, 10 AI credits, all integrations
- **Standard**: $8/month (or $80/year), 100 pages, 15,000 checks/mo, 15-min frequency, 12-month history, 100 AI credits, API access
- **Enterprise** (Most Popular): $30/month (or $300/year), 500 pages, 100,000 checks/mo, 5-min frequency, unlimited history, 1,000 AI credits, SSO, premium proxy pool, MCP server
- **Ultimate**: $99/month (or $990/year), 1,000 pages, 100,000 checks/mo, 2-min frequency, unlimited history, 5,000 AI credits with Pro-tier models, web archiving (WACZ), dedicated account manager, MCP server
- **Custom plans**: Available for higher volumes, 1-minute checks, and enterprise needs. Contact hey@pagecrawl.io
- All paid plans scale with quantity multipliers for more pages and checks
## Enterprise Features
- SAML 2.0 Single Sign-On (Azure AD, Google Workspace, Okta, OneLogin)
- User access roles and permissions (owner, admin, standard, viewer)
- Premium proxy pool for difficult-to-access sites
- CAPTCHA bypass service (additional cost)
- Higher quality screenshots
- MCP Server for AI assistant integration
- Invoice and PO billing (Ultimate, annual)
- Dedicated account manager (Ultimate)
## API
PageCrawl.io offers a RESTful API for programmatic access to:
- Create and manage monitored pages
- Retrieve change history and diffs
- Get screenshots and visual comparisons
- Configure notifications and integrations
- Trigger manual checks
- Manage folders, labels, and workspaces
## Support
- Free plan: Community support only
- Standard: Email support within 72 hours
- Enterprise: Premium email support within 24 hours
- Ultimate: Priority support within 24 hours with dedicated account manager
- Contact: hey@pagecrawl.io (sales), help_me@pagecrawl.io (support)
## Resources
- Website: https://pagecrawl.io
- Help Center: https://pagecrawl.io/help
- Blog: https://pagecrawl.io/blog
- Pricing: https://pagecrawl.io/pricing
- API Documentation: https://pagecrawl.io/help/features/article/does-pagecrawl-support-api
- Contact: https://pagecrawl.io/contact-us
- About: https://pagecrawl.io/about
- Privacy Policy: https://pagecrawl.io/privacy-policy
- Security: https://pagecrawl.io/security-statement
- GDPR: https://pagecrawl.io/gdpr
- Roadmap: https://pagecrawl.io/roadmap
- Full LLM reference: https://pagecrawl.io/llms-full.txt
---
# Knowledge Base / Help Center
The following sections contain the full content of all PageCrawl.io help center articles.
## Account Settings
### Cancel or Upgrade Account
URL: https://pagecrawl.io/help/account-settings/article/cancel-or-upgrade-account
# Cancel or Upgrade Account
### Changing plan or billing interval
If you would like to change or upgrade your plan, just go to your [Subscription settings](/app/settings/subscription) and choose a plan you want to switch to.
Upgrades/downgrades are prorated, meaning, that the unused time will be applied as a credit for the next payment.
e.g. you subscribed to $8/mo plan but you only used it for half-a-month and decided to upgrade to $30/mo plan. When upgrading, 4$ will be credited back and the remaining half-of-the-month of $30/mo plan will only cost you 11$.
### Canceling or Suspending your account
You can cancel your subscription, by going to your [Subscription settings](/app/settings/subscription) and clicking on the red **"Downgrade to Free"** button. The subscription will be canceled immediately.
---
### How to Change Email Address
URL: https://pagecrawl.io/help/account-settings/article/how-to-change-email-address
# How to Change Email Address
Unfortunately, for security and to prevent service abuse, email addresses cannot be changed directly by users.
To change your email address please contact support at [help_me@pagecrawl.io](mailto:help_me@pagecrawl.io) from your originally registered email address. We will verify the information and get back to you as soon as possible.
_Email address for 'Free Forever' plan users cannot be changed to prevent service abuse._
---
### How to Delete My Account
URL: https://pagecrawl.io/help/account-settings/article/how-to-delete-my-account
# How to Delete My Account
**Deletion of your account will result in loss of ALL data associated with it.**
To delete your account go to the **General Settings**, scroll to the bottom of the page, press **Permanently delete your account**, and proceed with the instructions.
---
### SAML SSO Configuration in PageCrawl
URL: https://pagecrawl.io/help/account-settings/article/saml-sso-configuration
# SAML SSO Configuration in PageCrawl
This guide covers the PageCrawl side of SSO setup: importing your identity provider's metadata, enabling SSO, configuring enforcement and user provisioning. For step-by-step instructions on configuring your identity provider (Azure AD, Google Workspace, Okta, etc.), see the [Identity Provider Setup Guide](/help/account-settings/article/set-up-identity-provider-for-saml-sso).
Single Sign-On (SSO) allows your team members to securely access PageCrawl using your organization's identity provider, such as Azure AD, Google Workspace, Okta, or OneLogin.
## Requirements
To use SAML SSO, your team must meet the following requirements:
- **Enterprise Plan** subscription
- **Corporate email domain** - The team owner must use a verified corporate email address (free email providers like Gmail, Yahoo, Outlook, and iCloud are not supported)
- **Identity Provider** that supports SAML 2.0 standard
## How to Configure SAML SSO
### 1. Access SSO Settings
Navigate to **Settings → Team → Auth & SSO** in your PageCrawl account. You must be a team administrator to access these settings.
When you first access the SSO settings page, PageCrawl automatically generates a unique identifier (UUID) and creates an initial SSO configuration for your team. This UUID is immediately available and used to create your Entity ID and Metadata URL.
### 2. Get Service Provider Information
Before configuring your Identity Provider, copy the **Metadata URL** displayed in the blue information box at the top of the SSO settings page.
The URL will look like: `https://pagecrawl.io/sso/saml/abc-123-def-456/metadata`
**Important:** Copy the actual URL shown in PageCrawl, not this example.
Most Identity Providers can automatically import all necessary configuration (Entity ID, ACS URL, Logout URL, etc.) from this metadata URL.
**Note:** If your IdP requires manual entry, the individual URLs are also displayed in the same box:
- Reply URL (Assertion Consumer Service URL)
- Sign on URL
- Logout URL
### 3. Configure Your Identity Provider
Follow the instructions in our [Identity Provider Setup Guide](./set-up-identity-provider-for-saml-sso) for your specific IdP (Azure AD, Google Workspace, Okta, etc.).
You'll need to create a SAML application in your IdP and provide the ACS URL and Entity ID from step 2.
### 4. Import Identity Provider Metadata into PageCrawl
You have three options to configure your IdP:
**Option A: Metadata URL** (Recommended)
- Enter your IdP's metadata URL
- Click "Parse Metadata from URL"
- PageCrawl will automatically extract all required settings
**Option B: Metadata XML**
- Copy your IdP's metadata XML
- Paste it into the metadata XML field
- Click "Parse Metadata XML"
**Option C: Manual Entry**
- Manually enter Entity ID, SSO URL, SLO URL, and X.509 Certificate
- This option is useful for custom configurations
### 5. Enable SSO Features
Configure the following settings based on your needs:
#### Enable SSO
Turn on SAML authentication for your domain.
#### Enforce SSO
When enabled, password login will be disabled for users with your email domain. Users must authenticate via your identity provider.
#### Just-in-Time (JIT) Provisioning
**Enable Automatic Account Creation**
- **Enabled**: New users logging in via SSO will automatically get accounts created
- **Disabled**: Only existing users can log in via SSO. New users must be manually added first.
When JIT provisioning is enabled, you can configure:
**Default Role for New SSO Users**
- Administrator
- Standard User
- Viewer
- Member
**Default Workspaces**
- Leave empty to assign all workspaces
- Select specific workspaces to limit access
**Auto-Create Personal Workspace**
- When enabled, each new SSO user gets a personal workspace
- Note: Your account has a workspace limit based on your subscription
- If the limit is reached, no personal workspaces will be created
## Workspace Limits
Personal workspace creation depends on your [subscription plan](/pricing):
If you enable "Auto-Create Personal Workspace" and have reached your limit, new SSO users will be assigned to default workspaces instead of creating personal workspaces.
## SSO Login Flow
Once configured, users with your email domain will:
1. Go to PageCrawl login page
2. Enter their email address
3. Be redirected to your identity provider
4. Authenticate with their corporate credentials
5. Be redirected back to PageCrawl and logged in automatically
If JIT provisioning is enabled and they're a new user, an account will be created automatically with the configured role and workspace assignments.
## Troubleshooting Common Issues
### "Team has reached member limit"
**Error:** "Unable to provision SSO user: Team has reached its member limit."
**Solution:**
- Check your subscription plan in **Settings → Team → Subscription**
- Either upgrade to a plan with more seats or remove inactive members
- Once you have available seats, the user can try logging in again
### "Automatic account creation is disabled"
**Error:** "Automatic account creation is disabled. Please ask your team administrator to enable JIT provisioning."
**Solution:**
- Enable **"Enable Automatic Account Creation"** in **Settings → Team → Auth & SSO**
- Or manually add the user in **Settings → Team → Members** before they log in
### User Not Assigned in Identity Provider
**Symptoms:** User gets error after authenticating at IdP.
**Solution:**
- **Azure AD:** Go to Enterprise Applications → PageCrawl → Users and groups → Add user/group
- **Google Workspace:** Admin Console → PageCrawl app → User access → Enable for user's org unit
- **Okta:** Applications → PageCrawl → Assignments → Assign to People
### Certificate Expired or Invalid
**Symptoms:** "Invalid signature" or authentication fails at final step.
**Solution:**
1. In PageCrawl SSO settings, update the metadata:
- Click **Parse Metadata from URL** to refresh, or
- Download fresh XML from IdP and paste it, then click **Parse Metadata XML**
2. Most IdPs rotate certificates every 1-3 years
### Metadata Import Errors
**Common Issues:**
- **EntitiesDescriptor Format:** PageCrawl requires `EntityDescriptor` format, not `EntitiesDescriptor`
- **Invalid XML:** Ensure you copied the entire XML including ` Primary email
- **Signed response**: Leave unchecked (PageCrawl requires signed assertions, which is the industry standard default)
2. Click **Continue**
3. Click **Finish** (skip attribute mapping)
### Step 4: Import Metadata to PageCrawl
1. Open the downloaded metadata XML file
2. In PageCrawl SSO settings, paste the content into **Metadata XML** field
3. Click **Parse Metadata XML**
### Step 5: Turn On the App
1. In Google Admin, click on your PageCrawl app
2. Click **User access**
3. Select **ON for everyone** or specific organizational units
4. Click **Save**
---
## Okta
### Step 1: Add Application
1. Sign in to your [Okta Admin Console](https://admin.okta.com)
2. Go to **Applications → Applications**
3. Click **Create App Integration**
4. Select **SAML 2.0** and click **Next**
### Step 2: General Settings
1. Enter "PageCrawl" as the **App name**
2. (Optional) Upload a logo
3. Click **Next**
### Step 3: Configure SAML
1. In the **SAML Settings** section, enter:
- **Single sign-on URL**: Paste your Reply URL from PageCrawl (e.g., `https://pagecrawl.io/sso/saml/abc-123.../acs`)
- **Audience URI (SP Entity ID)**: Paste your Entity ID from PageCrawl (e.g., `https://pagecrawl.io/sso/saml/abc-123.../metadata`)
- **Name ID format**: EmailAddress
- **Application username**: Email
2. Leave other settings as default
3. Click **Next**
### Step 4: Feedback
1. Select **I'm an Okta customer adding an internal app**
2. Click **Finish**
### Step 5: Get Metadata URL
1. On the **Sign On** tab, scroll to **SAML Signing Certificates**
2. Click **Actions** next to the active certificate
3. Click **View IdP metadata**
4. Copy the URL from your browser's address bar
5. In PageCrawl SSO settings, paste this URL in the **Metadata URL** field
6. Click **Parse Metadata from URL**
### Step 6: Assign Users
1. Go to the **Assignments** tab
2. Click **Assign** and select **Assign to People** or **Assign to Groups**
3. Assign users who should have access to PageCrawl
4. Click **Done**
---
## OneLogin
### Step 1: Add Application
1. Sign in to your [OneLogin Admin Console](https://app.onelogin.com/admin)
2. Go to **Applications → Applications**
3. Click **Add App**
4. Search for "SAML Test Connector (Advanced)" and select it
### Step 2: Configure Application
1. Enter "PageCrawl" as the **Display Name**
2. Click **Save**
### Step 3: Configure SAML Settings
1. Go to the **Configuration** tab
2. Enter the following:
- **Audience (Entity ID)**: Paste your Entity ID from PageCrawl (e.g., `https://pagecrawl.io/sso/saml/abc-123.../metadata`)
- **Recipient**: Paste your Reply URL from PageCrawl (e.g., `https://pagecrawl.io/sso/saml/abc-123.../acs`)
- **ACS (Consumer) URL Validator**: Use regex pattern `https://pagecrawl\.io/sso/saml/[^/]+/acs`
- **ACS (Consumer) URL**: Paste your Reply URL from PageCrawl (e.g., `https://pagecrawl.io/sso/saml/abc-123.../acs`)
3. Click **Save**
### Step 4: Get Metadata URL
1. Go to the **More Actions** menu
2. Select **SAML Metadata**
3. Copy the metadata URL
4. In PageCrawl SSO settings, paste this URL in the **Metadata URL** field
5. Click **Parse Metadata from URL**
### Step 5: Assign Users
1. Go to the **Users** tab
2. Select users who should have access
3. Click **Save**
---
## Custom SAML 2.0 Provider
If your identity provider isn't listed above but supports SAML 2.0, you can configure it manually:
### Step 1: Configure Your Identity Provider
In your IdP, create a new SAML application with these settings:
- **Entity ID**: Paste your Entity ID from PageCrawl (you copied this in the first section above, e.g., `https://pagecrawl.io/sso/saml/abc-123.../metadata`)
- **ACS URL**: Paste your Reply URL from PageCrawl (e.g., `https://pagecrawl.io/sso/saml/abc-123.../acs`)
- **NameID Format**: Email Address
- **Binding**: HTTP-POST for ACS, HTTP-Redirect for SSO
### Step 2: Get IdP Information
From your identity provider, collect:
- **Entity ID** (IdP Issuer)
- **SSO URL** (Sign-on URL)
- **SLO URL** (Sign-out URL) - Optional
- **X.509 Certificate**
### Step 3: Manual Configuration in PageCrawl
1. In PageCrawl SSO settings, select the **Manual Entry** tab
2. Enter the collected information:
- Entity ID
- SSO URL
- SLO URL (optional)
- X.509 Certificate (paste the full certificate including BEGIN/END markers)
3. Enable SSO and configure JIT provisioning settings
4. Click **Save Changes**
---
## Validation
After configuration, test your SSO:
1. Open an incognito/private browser window
2. Go to PageCrawl login page
3. Enter a test user's email address with your domain
4. Verify you're redirected to your IdP
5. Complete authentication
6. Verify you're logged into PageCrawl successfully
If you encounter issues, check:
- User is assigned to the PageCrawl application in your IdP
- Email domain matches your configured domain
- Metadata was imported correctly
- X.509 certificate is valid and not expired
---
## Notes
- **Metadata XML Format**: PageCrawl does not support the `EntitiesDescriptor` element. Use `EntityDescriptor` format.
- **Multiple IdPs**: PageCrawl supports one identity provider per team.
- **Certificate Rotation**: When your IdP certificate expires, update the metadata in PageCrawl SSO settings.
## Support
For assistance with your specific identity provider, contact [support@pagecrawl.io](mailto:support@pagecrawl.io).
---
### User Access Roles and Permissions
URL: https://pagecrawl.io/help/account-settings/article/user-access-roles
# User Access Roles and Permissions
PageCrawl uses role-based access control to manage what each team member can do. There are four roles, each with different permission levels.
### Available Roles
| Role | Manage Team | Manage Workspaces | Edit Pages | View Pages |
|------|:-----------:|:-----------------:|:----------:|:----------:|
| **Owner** | Yes | Yes | Yes | Yes |
| **Administrator** | Yes | Yes | Yes | Yes |
| **Standard User** | No | No | Yes | Yes |
| **Viewer** | No | No | No | Yes |
### Owner
Each team has exactly one Owner (the account creator). The Owner has full control over all team settings, billing, and member management. Ownership cannot be transferred or removed.
### Administrator
Administrators can manage the team on behalf of the Owner:
- Invite and remove team members
- Change member roles
- Assign workspace access to members
- Create and delete workspaces
- Edit all team and workspace settings (notifications, integrations, AI, etc.)
- Full access to all workspaces
### Standard User
Standard Users can work within their assigned workspaces:
- View and edit monitored pages in assigned workspaces
- Create new pages and tracked elements
- Review changes and leave feedback
- Access all monitoring features within their workspaces
Standard Users cannot invite members, change roles, or access workspaces they haven't been assigned to.
### Viewer
Viewers have read-only access to their assigned workspaces:
- View monitored pages and detected changes
- Browse change history and reports
- Cannot create, edit, or delete pages
- Cannot modify any settings
### Managing Team Members
To manage roles and access:
1. Go to **Settings** > **Team** > **Users**
2. View the member list showing name, email, workspaces, and role
3. Click a member's role to change it (Owner and Administrator only)
4. Click **Update** in the Workspaces column to assign or revoke workspace access
### Inviting New Members
1. Go to **Settings** > **Team** > **Users**
2. Click **Invite Member**
3. Enter their email address and select a role
4. The invite expires after 2 weeks. You can resend it if needed.
### Workspace Access
Members only see workspaces they've been assigned to. Administrators can assign workspace access per user. If all workspace access is removed from a user, they are removed from the team entirely.
This means you can have team members who only see specific projects, clients, or departments without exposure to other workspaces.
---
## Features
### Advanced Configuration Options for Power Users
URL: https://pagecrawl.io/help/features/article/advanced-configuration
# Advanced Configuration Options for Power Users
PageCrawl offers advanced configuration options for users who need fine-grained control over their monitoring setup. This guide covers the key power-user features.
### Power User Mode
When editing a monitored page, you can enable **Power User** mode using the toggle in the page settings. This reveals additional settings that are hidden by default to keep the interface clean for everyday use.
With Power User mode enabled, you get access to:
- **Engine selection** - Choose between the default browser engine, Stealth Mode (for sites that block bots), or Fast mode (optimized for static pages)
- **Intelligent Reconnect** - Automatically retry failed checks with a different approach
- **Custom User Agent** - Set a specific browser user agent string
- **Custom Headers** - Add custom HTTP headers to requests
- **Custom JavaScript** - Run JavaScript code before or after page load
- **Device emulation** - Emulate specific device viewports
Power User settings are marked with a special icon throughout the edit form so you can easily identify them.
### Advanced Mode vs Simple Mode
PageCrawl offers two ways to add and edit monitored pages:
**Simple Mode** (default) guides you through setup step by step. It auto-detects the best settings, shows a live preview, and covers the most common use cases. Best for getting started quickly.
**Advanced Mode** gives you full control over every setting in a single form. Use it when you need to:
- Track multiple elements on the same page simultaneously
- Configure complex action sequences
- Set up templates or apply existing ones
- Fine-tune notification conditions per element
- Work with custom selectors, thresholds, and comparison methods
You can switch to Advanced Mode from the Simple Mode page by clicking the "Advanced setup" link at the bottom. If you prefer to always use Advanced Mode, check the "Always show Advanced Setup" option.
### Multiple Tracked Elements
Each monitored page can track multiple elements simultaneously, each with its own comparison method:
| Type | What It Tracks |
|------|---------------|
| **Full Page** | Entire page text content |
| **Text** | Text content of a specific element (by CSS/XPath selector) |
| **Number** | Numeric values with configurable change thresholds |
| **Price** | Price values with currency detection |
| **Availability** | In-stock/out-of-stock status |
| **Links** | All outgoing links on the page |
| **Visual** | Visual screenshot comparison with diff percentage |
| **HTML** | Raw HTML structure of an element |
| **Boolean** | Presence or absence of an element |
| **JSON** | JSON response content with path extraction |
Each tracked element can have its own set of [actions](/help/features/article/perform-actions) and comparison settings.
### Templates
Templates let you save a monitoring configuration and apply it to multiple pages automatically. This is especially useful when combined with [Page Discovery](/help/features/article/page-discovery) for auto-monitoring newly discovered pages.
To create a template:
1. Go to **Settings** > **Workspace** > **Templates**
2. Enter a sample URL to auto-fill settings
3. Configure tracked elements, actions, check frequency, and notifications
4. Save the template
Templates can also define URL filters for page discovery, so new pages matching your criteria are automatically monitored with the template's settings.
### Bulk Editing
Edit settings across multiple pages at once:
1. Select pages from your page list using the checkboxes
2. Click **Bulk Edit** in the toolbar
3. Choose what to change: check frequency, engine, proxy, actions, notifications, tags, or folder
4. Apply changes to all selected pages
Available on paid plans.
### AI Configuration
Configure AI-powered change analysis per workspace:
1. Go to **Settings** > **Workspace** > **Integrations** > **AI**
2. Choose your AI provider (OpenAI, Gemini, or Anthropic)
3. Select a model
4. Optionally set focus areas to guide the AI on what changes matter most
Each plan includes monthly AI credits. You can also bring your own API key (BYOK) for unlimited usage. See [AI BYOK Setup](/help/integrations/article/ai-byok-setup-guide) for details.
### Custom Check Scheduling
Control exactly when PageCrawl checks your pages:
1. Go to **Settings** > **Workspace** > **Schedule**
2. Set active monitoring hours (e.g., business hours only)
3. Choose which days of the week to run checks
4. Set the workspace timezone
This helps reduce unnecessary checks during off-hours and keeps your check quota focused on the times that matter.
### Global Filters
Apply text filters across all pages in a workspace:
1. Go to **Settings** > **Workspace** > **General**
2. Add global ignored text patterns
3. These patterns are excluded from change detection on every page in the workspace
Useful for filtering out dynamic content like timestamps, ad copy, or session IDs that appear across many pages.
### Proxy Configuration
Choose where PageCrawl checks your pages from:
- **Default** - Automatic server selection
- **Custom proxy** - Use your own proxy server for pages behind firewalls or geo-restrictions
- **Location-specific** - Select from available proxy locations (London, New York, San Francisco, Toronto, Frankfurt, Tel Aviv)
- **Residential** - Use residential IP addresses for pages that block datacenter IPs
Configure per page or apply via bulk edit.
---
### AI-Powered Change Detection and Smart Filtering
URL: https://pagecrawl.io/help/features/article/ai-powered-change-detection
# AI-Powered Change Detection and Smart Filtering
PageCrawl.io includes AI-powered analysis for all users. Every plan comes with monthly AI credits that work automatically with zero setup. When a page changes, AI summarizes what happened and scores how important the change is, so you only get notified about what matters.
For users who need more, you can also bring your own API key (BYOK) for unlimited AI usage and full model control.
## AI Credits
Every plan includes monthly AI credits:
| Plan | Monthly Credits |
|------|----------------|
| **Free** | 10 |
| **Standard** | 100 (scales with quantity) |
| **Enterprise** | 1,000 (scales with quantity) |
| **Ultimate** | 5,000 (scales with quantity, includes Pro tier) |
Credits are based on page size. Each 4,000-token block costs 1 credit on Basic tier or 10 credits on Pro tier (Ultimate plan only). A typical blog post uses 1-2 credits. Credits reset monthly.
When credits run out, page monitoring continues normally, but AI summaries and importance filtering pause until the next billing cycle. You can also switch to BYOK at any time for unlimited usage.
## Getting Started
No setup is required. AI features are enabled by default for all workspaces:
1. Add pages to monitor as usual
2. When changes are detected, AI automatically summarizes them and assigns importance scores
3. View your credit usage in **Settings > Workspace > Integrations > AI**
**Workspace-specific**: AI features are configured per workspace. You can have some workspaces with AI enabled and others without.
## How AI Features Work
| Feature | Process |
|---------|---------|
| **Summarization** | Change detected > Content sent to AI > Human-readable summary generated > Included in notification |
| **Importance Scoring** | Change detected > AI analyzes content > Priority score assigned (0-100) > Low-priority changes filtered |
| **[Label Automation](#ai-label-automation)** | Change detected > AI evaluates your label rules > Labels automatically added or removed |
## Configuration
### Available for All Users
| Setting | Description |
|---------|-------------|
| **Custom Instructions** | Teach AI what matters for your monitoring (max 2,000 chars) |
| **Summary Language** | Generate summaries in 35+ languages |
| **Notification Threshold** | Set threshold (0-100) for Importance Scoring. Changes scoring below this still get tracked but do not trigger notifications. |
### Additional BYOK Settings
These settings are available when using your own API key:
| Setting | Description |
|---------|-------------|
| **Deep Analysis** | Send full page content to AI for better context. Uses more tokens but provides more accurate analysis. When disabled, only the changed text (diff) is sent. |
| **Run on First Check** | Get AI analysis on the initial page check, before any changes are detected |
| **AI Requests Per Month** | Set a monthly cap to control costs. When the limit is reached, AI features pause until the next month. Leave empty for unlimited. |
| **Per Page Per Day** | Limit how many AI analyses a single page can trigger in 24 hours. Prevents noisy pages from consuming your entire budget. Default: 10. |
| **Max Tokens** | Limit content size per request. If content exceeds this limit, AI analysis is skipped for that change. |
### Understanding Tokens
A **token** is roughly 4 characters or about 3/4 of a word. With included credits, each 4,000-token block counts as 1 credit.
| Page Type | Typical Tokens |
|-----------|---------------|
| Simple (blog, article) | ~1,000-2,000 |
| Medium (product, news) | ~2,000-5,000 |
| Large (documentation) | ~5,000-10,000 |
## Using Your Own API Key (BYOK)
If your included credits are not enough, or you want full control over model selection, you can connect your own API key from OpenAI, Google Gemini, Anthropic, or OpenRouter.
1. Go to **Settings > Workspace > Integrations > AI**
2. Select your AI provider and enter your API key
3. Click **Test Connection** to verify
4. Choose your preferred model and save
When using BYOK, AI credits are not consumed and you pay your AI provider directly. See the [BYOK Setup Guide](/help/integrations/article/ai-byok-setup-guide) for detailed instructions.
## Best Practices
### Start Small
- AI is enabled by default, so monitor your credit usage for the first few weeks
- Check usage statistics in **Settings > Workspace > Integrations > AI**
- If you need more credits, upgrade your plan or connect your own API key
### Optimize Credit Usage
- Use Custom Instructions to help AI focus on what matters
- A daily cap of 10 analyses per page prevents noisy pages from consuming your budget
- For high-volume monitoring, consider BYOK with a budget model like Gemini Flash-Lite
### Choose the Right Mode
| Scenario | Recommendation |
|----------|---------------|
| Getting started | Use included credits (no setup needed) |
| High-volume pages | Enable Importance Scoring to filter noise |
| Technical pages | Enable Summarization for readable changes |
| Need unlimited AI | Connect your own API key (BYOK) |
| Critical pages | Use BYOK with premium models (GPT-4.1, Claude Sonnet) |
## AI Label Automation
AI can automatically apply or remove labels on detected changes based on rules you define. Instead of manually categorizing changes, the AI reads each change and decides which labels to add or remove according to your instructions.
### How to Set It Up
1. Go to **Settings > Workspace > Labels**
2. Scroll to the **AI Label Automation** section
3. Click **Add Rule** to create a label/instruction pair
4. For each rule, choose a label name and write a plain-language instruction explaining when the AI should apply it
5. Click **Save Changes**
You can configure up to 10 label rules per workspace.
### How It Works
Each time a change is detected and AI analysis runs, the AI evaluates the change against your label rules and decides which labels to add or remove. The AI receives the current labels on the page, so it can remove labels that no longer apply (e.g., removing "Out of Stock" when a product is back in stock).
Labels are applied to the change record, making them available for filtering on the [Review Board](/help/features/article/review-board) and in your page list.
### Example Rules
| Label | Instruction |
|-------|-------------|
| Breaking News | Apply when urgent or breaking news appears |
| Policy Update | Apply when terms, policies, or legal text changes |
| New Event | Apply when a new conference or event is announced |
| Job Posted | Apply when new job listings are added |
| Content Removed | Apply when significant content is deleted from the page |
### Important Notes
- AI can only manage labels defined in your automation rules. Manually applied labels are never touched.
- Label names have a maximum of 50 characters; instructions have a maximum of 500 characters.
- Labels are created automatically if they do not already exist in your workspace.
- AI Label Automation requires AI to be configured for the workspace (either included credits or BYOK).
- Label decisions run as part of the standard AI analysis, so no additional credits are used beyond the normal change analysis.
## Security and Privacy
| Aspect | Details |
|--------|---------|
| **Included credits** | Content is processed through PageCrawl's managed AI infrastructure |
| **BYOK mode** | Content is sent directly to your chosen AI provider |
| **Storage** | AI summaries stored in PageCrawl.io for your reference |
| **Security** | All transmission via HTTPS, API keys encrypted at rest |
| **Provider policies** | Review your AI provider's data usage and retention policies when using BYOK |
## Related Articles
- [AI Integration Setup Guide (BYOK)](/help/integrations/article/ai-byok-setup-guide) - Step-by-step guide to configure your own API keys for unlimited AI usage
- [Choosing the Right AI Model for Website Monitoring](/help/tutorials/article/choosing-best-ai-model-website-monitoring) - Compare models and pricing for BYOK users
---
### API and Webhooks for Custom Integrations
URL: https://pagecrawl.io/help/features/article/api-webhooks-for-custom-integrations
# API and Webhooks for Custom Integrations
PageCrawl provides a REST API and webhook system for integrating page monitoring into your own applications and workflows. Use the API to manage monitors programmatically and webhooks to receive real-time notifications when changes are detected.
*Available on paid plans.*
### Authentication
All API requests require a Bearer token. Find your API key in **Settings** > **API**.
Include it in the `Authorization` header:
```
Authorization: Bearer YOUR_API_KEY
```
### API Endpoints
| Method | Endpoint | Description |
|--------|----------|-------------|
| `GET` | `/api/pages` | List all monitored pages |
| `POST` | `/api/pages` | Create a new monitored page |
| `GET` | `/api/pages/{slug}` | Get page details and latest values |
| `PUT` | `/api/pages/{id}` | Update page settings |
| `DELETE` | `/api/pages/{id}` | Delete a monitored page |
| `PUT` | `/api/pages/{id}/check` | Trigger an immediate check |
| `PUT` | `/api/pages/{id}/status` | Enable or disable a page |
| `GET` | `/api/pages/{id}/history` | Get check history for a page |
Additional endpoints are available for folders, tags, webhooks, and RSS feeds.
### Webhooks
Webhooks send HTTP POST requests with a JSON body to your endpoint whenever a page change is detected or an error occurs. Configure webhooks in **Settings** > **Workspace** > **Integrations** > **Webhooks**.
| Setting | Description |
|---------|-------------|
| **Target URL** | The HTTP endpoint that receives the POST request |
| **Event triggers** | Change detected, error, or both |
| **Page filter** | Limit to a specific page, or fire for all pages in the workspace |
| **Payload fields** | Select which fields to include (all by default) |
Available payload fields include page ID, title, change summary, diff data, screenshots, AI summary, AI priority score, and more. See the [Webhook Integration guide](/help/integrations/article/webhook-integration) for the full field reference and example payloads.
### Common Use Cases
- **Custom dashboards** - Pull change data into your own monitoring dashboard via API
- **Automation workflows** - Trigger actions in n8n, Make, Zapier, or custom scripts via webhooks
- **Database logging** - Store all detected changes in your own database
- **Alerting systems** - Forward high-priority changes to PagerDuty, Opsgenie, or similar
### Related Articles
- [Webhook Integration](/help/integrations/article/webhook-integration) - Detailed webhook setup, payload reference, and testing
- [Zapier Integration](/help/integrations/article/pagecrawl-zapier-integration) - Connect PageCrawl to 5,000+ apps
- [n8n Integration](/help/integrations/article/pagecrawl-n8n-integration) - Open-source workflow automation
- [RSS Feeds](/help/features/article/page-monitoring-rss-feeds) - Subscribe to changes via RSS
---
### Automatically Discover New Pages To Track
URL: https://pagecrawl.io/help/features/article/page-discovery
# Automatically Discover New Pages To Track
PageCrawl is designed to make website change monitoring and management seamless. The "Discover New Pages" feature takes your change monitoring to the next level by automatically identifying new links, tracking changes, and ensuring your online presence remains up-to-date. In this guide, we'll delve into the capabilities of this feature, including its scanning methods, automated monitoring, and filtering options.
### Automated Link Discovery
This feature performs automated scans of your website, identifying new links that have been added. This proactive approach keeps you informed about any changes to your website's link structure and updates.
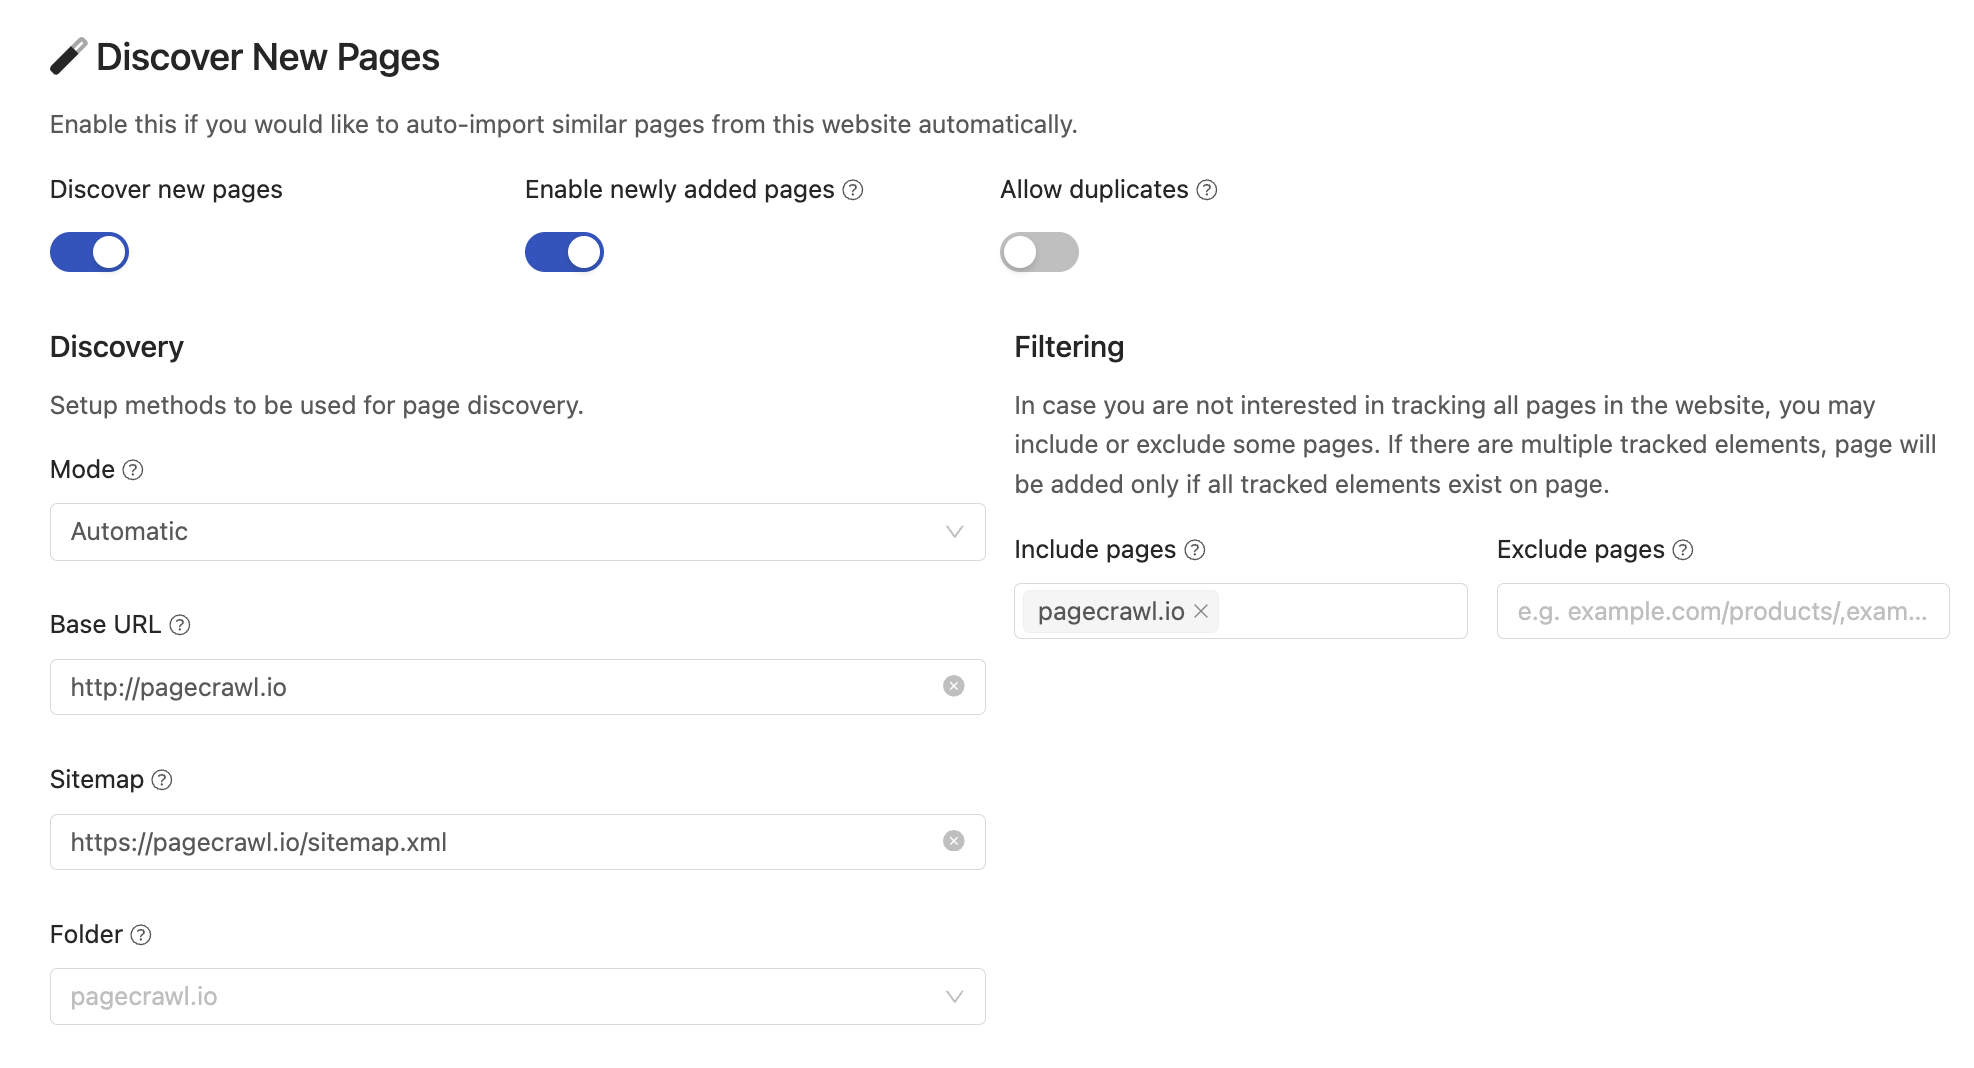
### Choice of Scanning Methods
PageCrawl provides multiple scanning methods to suit your needs. All available discovery options are enabled by default (Mode: Automatic):
* **Base URL Link Discovery**: Discover new links directly on your provided base URL. This method is particularly useful if you want to focus on specific sections of your website without going too deep.
* **Deep Scan**: Conduct a comprehensive analysis by visiting every accessible page on your website. This ensures that no new links go unnoticed, even on nested pages.
* **Sitemap Scan**: Utilize existing sitemaps to uncover new links. This method is efficient for websites with extensive content structures. Since most websites want to be featured on search engines like Google and Bing, they usually have sitemaps.
### Filtering Options
* **Include Pages**: Specify keywords or patterns that pages must contain to be included in monitoring. Useful for tracking specific types of content.
* **Exclude Pages**: Define keywords or patterns that pages must not contain to be included in monitoring. Ideal for excluding pages that you are not interested in.
### Configuring Automated Monitoring and Tracking
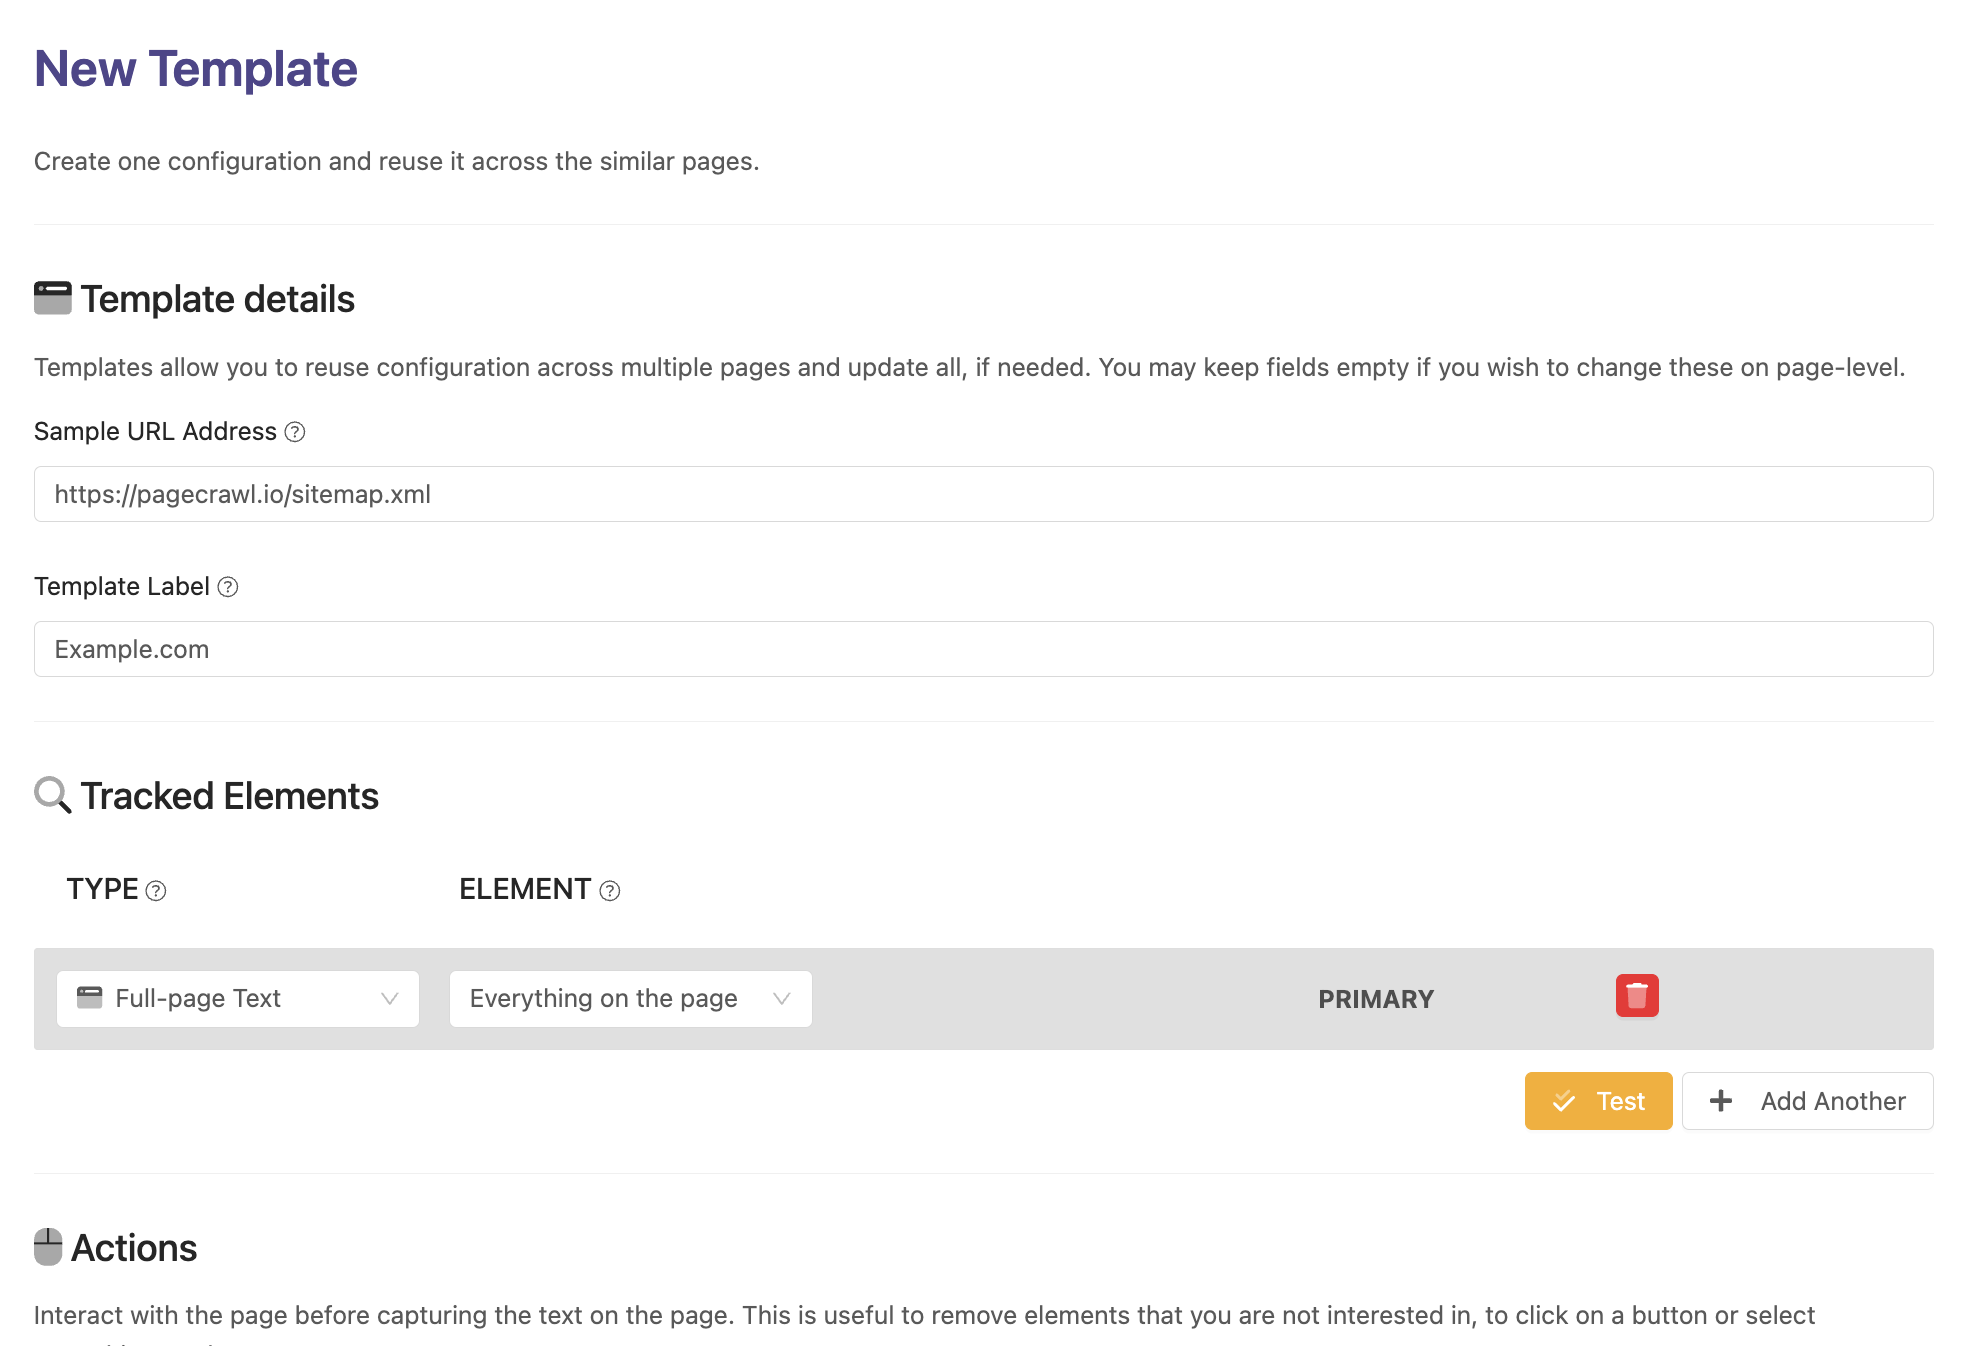
### Create a Template
To start monitoring the website and automatically discover all new pages, configure a new [Template](https://pagecrawl.io/app/settings/workspace/templates) which will serve as the basis for monitoring new pages.
1. Under "Sample URL address," enter an example page URL that you wish to track. The rest of the fields will be auto-filled for you.
### Configure Tracked Elements
You may choose to monitor all pages on the website or only those with a specific structure (e.g., if you only want to track product pages and not other pages).
1. If you wish to monitor all pages, for Tracked Element configuration, select "Full-page Text."
2. To monitor pages with a specific layout, configure multiple Tracked Element configurations, such as product title, price, and description. If these elements do not exist on the page, the page will simply be skipped.
### Enable "Discover New Pages" feature
1. Activate the "Discover New Pages" feature and customize any settings if needed.
2. Save the template and watch out for newly added pages when they become discovered
3. If there are too many irrelevant pages discovered, adjust filters and remove irrelevant pages.
---
### Available Tracked Element Types
URL: https://pagecrawl.io/help/features/article/available-tracked-monitoring-types
# Available Tracked Element Types
When monitoring changes on a webpage, the type of tracked element selected defines what kind of content will be tracked and how updates are detected. You may use multiple tracked elements for each monitored page to monitor different areas of the page. Below is a detailed breakdown of the different tracked element types:
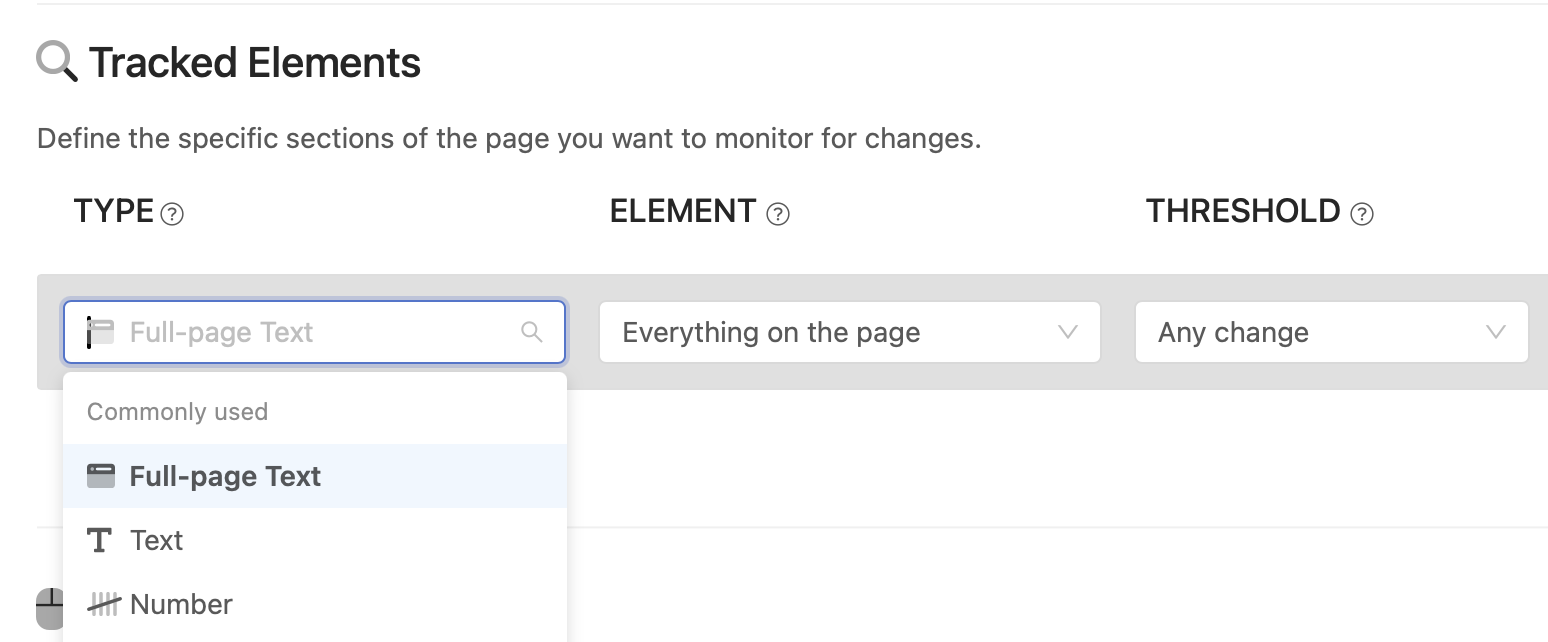
### Commonly Used Tracked Element Types
#### 1. Full Page Text
- **Description:** Tracks all visible text on the entire webpage.
- **Use Case:** Useful for capturing comprehensive textual content.
#### 2. Text
- **Description:** Monitors text changes in a specified area of a webpage.
- **Important Note:** Only the first element matching the selector is tracked.
- **Use Case:** Ideal for tracking text in specific areas, like headlines or descriptions.
#### 3. Number
- **Description:** Extracts and monitors numeric values in a specific webpage area.
- **Features:** Provides basic statistical analysis and visual graphs.
- **Use Case:** Useful for tracking numbers, such as stock levels or scores.
#### 4. Visual
- **Description:** Monitors and alerts on visual changes in a specified area.
- **Note:** This is a beta feature; report any issues encountered.
- **Use Case:** Ideal for tracking visual changes like layout updates or style changes.
### Page Areas
#### 1. Price
- **Description:** Detects and extracts the first price found on the page.
- **Limitation:** May not work well on pages with multiple prices.
- **Use Case:** Monitoring product prices on e-commerce websites.
#### 2. Links
- **Description:** Tracks internal and external links originating from a webpage.
- **Use Case:** Ideal for monitoring link changes on resource-heavy websites.
#### 3. Iframes
- **Description:** Monitors embedded content within `